31 January 2011

Colouring with Words (Calligrams)

This lesson was inspired by a post I saw on the Lines, Dots and Doodles blog. As soon as I saw it, I knew it would be a great drawing activity for ESL students. 

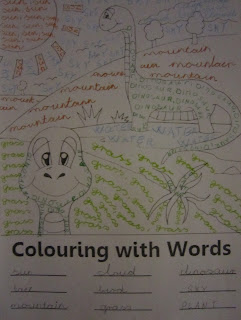
Basically, instead of just colouring in a picture as normal, this activity requires the kids to write words (in English) to colour in their pictures. Even better, they usually have to write the words over and over again which is great spelling practice.

While it would certainly be possible to get students to create their own drawing from scratch, I decided to give them a customised colouring page to work with instead. I thought this was a safer option for ESL students because it enabled me to control the content of their pictures - the colouring page format ensured that the kids didn't draw pictures that were too complicated or that contained a lot of vocabulary that they weren't familiar with.

I did this activity with my Grade 2 class and all of the kids managed to finish colouring at least one picture during the 40 minute lesson. Here are a couple of examples.


The complete lesson plan is available by clicking "Read more".

24 January 2011

How to draw a possum

Last week I did another Australian-themed drawing activity with my Grade 2 class. It was inspired by this entry on the Use Your Coloured Pencils blog.

We've been learning about various Australian animals over the last few weeks, so I thought that getting the kids to draw some cute possums would be fun.

Rather than just showing the kids a completed picture and getting them to copy it, I decided to get them to follow the drawing process with me step-by-step. This was beneficial for two reasons. Firstly, it helped to keep everyone in the class going at the same pace. Secondly, it provided an opportunity to reinforce existing vocabulary and introduce new words during the drawing process.

This is a really simple project that only requires ordinary white paper, greylead pencils, crayons, scissors and glue. It's also very quick - all 20 students in the class managed to finish in 40 minutes. 

Here are some of the finished results:


Unfortunately I don't have any pictures of the possum drawings in progress, but I have included the language/instructions that I gave the students. Click "Read more" to see them.

23 January 2011

Didgeridoos

The 26th of January is Australia Day and we're having a party at school on the 27th to celebrate. There are going to be lots of Australian games, songs and activities for the kids to enjoy. Over the last few weeks, in the lead up to the party, we've been teaching the kids all about Australia. Last week this culminated in the Grade 3 students painting their very own didgeridoos.

For those who don't know, didgeridoos are musical instruments used by Australian aborigines. They are usually made from wood that has been hollowed out by termites. Check out Wikipedia for more information.

Due to a distinct lack of termites in Hungary, I decided to consult the web for other ideas about how the kids could made their own didgeridoos. I soon discovered a cool website which provided the inspiration for my lesson.

PREPARATION


I wanted this to be a one-lesson project, so I did a lot more prep work than I would normally do. If you want to make the didgeridoos over two weeks, dedicate the first lesson to preparation.
  1. Head down to a local hardware store and buy some plastic piping. We bought our pipes for about 1,000 forints each (approximately AUD$5) which was enough for two didgeridoos.

  2. Sand the ends of the pipes with sandpaper.

  3. Find a chair with legs narrow enough for the pipes to fit over. Turn the chair upside down, cover it with protective newspaper or plastic sheeting and place a pipe over each leg.


  4. Apply a base coat of brown paint to the pipe. I found that tempera paint did not adhere to the plastic piping, so I bought a sample pot of house paint at the hardware store. Being unable to read the Hungarian print on the label, I mistakenly bought glossy paint, but I think matt paint would look more authentic.
IN THE CLASSROOM
  1. Set up the didgeridoos in the classroom ready to be painted (as per point 3 above).

  2. Write “Didgeridoo” on the board.
    Ask the kids – “What is a didgeridoo?”
    They may be able to mime or draw a didgeridoo if they can't explain it in English.
     
  3. If possible, show the class a YouTube video featuring a didgeridoo (I used this one.) Otherwise, just show some pictures or mime/draw a didgeridoo.
    Get the kids to practice saying the word didgeridoo.

  4. Tell the kids that they are going to paint their own didgeridoo.
    Show the kids samples of aboriginal art.
    Ask the kids "What colours can you see?" Write the colours on the board.
    Ask the kids "What patterns can you see?" Draw some patterns on the board or get the kids to come up and draw them. Aboriginal art uses lots of dots, circles and simple lines.

  5. As I didn't want the house paint to ruin the kids' paintbrushes, I bought a pack of cotton buds to be used as makeshift brushes. These worked well for drawing dots and gave the didgeridoos a more authentic, primative look. Also, using them was fun!

  6. Make sure the kids have their art smocks on, give them a little pot with one colour of paint and let them paint their designs on the didgeridoos. When they have finished with one colour, they can swap with other students.


  7. As the students are working, walk around the room and ask questions to reinforce the vocabulary - for example "What pattern are you painting?"

  8. Wait for the didgeridoos to dry, then put one end to your mouth and blow. They sound almost like the real thing and they look awesome!

22 January 2011

Woo hoo, new blog!

I have been wanting to create an art and craft blog for a few months now, and tonight seemed like as good a time as any to get started.

For the past four and a half months, I've been teaching "drawing" to grade 1, 2 and 3 students at a primary (elementary) school in Hungary. As far as I can tell, these "drawing" classes are not supposed to be particularly technical - they are more like craft sessions which are taught in English. I'm quite relieved about this as I have no formal art training and my drawing ability never really matured much beyond stick figures. In addition to the "drawing" classes which I teach, most of the kids also have graphics (grafika) classes in Hungarian where they learn proper art stuff (like how to draw a face with the correct proportions, colour theory and shading techniques, etc).

The main idea behind the "drawing" classes seems to be for the kids to get used to listening to and understanding instructions in English. The secondary focus is helping the kids to pick up a few new English words. And, of course, the third focus is having fun and making something cool.

Teaching "drawing" to the kids has been quite challenging so far. In addition to the language barrier, the limited amount of time allocated to each class also poses problems. Each "drawing" class is only 40 minutes long - which really isn't that much time to explain and demonstrate the activity in English, get 20 kids to complete it and then get them all packed up and ready for the next class.

Another challenge is the lack of resources. The kids have colour pencils, tempera paints, crayons, scissors, glue, ordinary A4 paper and that's about it. This seems a far cry from the art classes that I remember attending in primary school where we had loads of cool craft supplies. Things like googly eyes, glitter, ribbons, clay and coloured cardboard were always readily available - not the case here unfortunately! We do try to buy the kids more interesting supplies, but we can't afford to do that all the time. And I hate to ask the school to buy them as I know they don't have a lot of money to splash around.

Anyway, it is my hope that this blog will provide a source of simple, cheap and quick art and craft activities that can be taught using limited English.

- Amanda